
Are you looking for a solution to change your MAC address? but haven’t found any working articles that provide in-depth articles that help in changing your Mac address. Now, you have landed on this article, Then you have come to the right article.
In this article, you are going to see complete information on how to change the MAC address of your Android device and Windows. I am sure that after reading this article you can successfully change your MAC address without any problem.
Now, Before heading into the ‘How’ part of the article, let us see a brief intro about ‘What’ Is Mac Address.
- Also, Read How To Download Any Instagram Videos
What is MAC Address?
A Media Access Control address (MAC address) is a 12-character unique identifier assigned to a specific piece of hardware such as the network adapter of your WiFi device. In simple words, a MAC address can be used to identify your electronic and wireless device such as an Android, iPhone, or Windows on the Internet, or the local network.
How To Find Mac Addresses
Well, I assume that the person who reading this article must be aware of the MAC address location on his device. However, if you don’t know where to find the MAC address of your device, you’ll find it under:
- On Android Devices: Settings > About phone or About device > Status > WiFi MAC Address.
- In Windows: Network & Internet settings > Network and Sharing Center > Click on your Wi-Fi connection > Go to Details
- And In iPhones: Settings > General > About > Wi-Fi Address
Change Mac Address on Android
There are two ways to change the MAC address on your Android device:
- With Root Access
- ChameleMAC
- Terminal
- Without Root Access
Method 1 – Using Root Access
This is the method that can be performed only on Android devices on which you have root access. If the Root Checker app confirms that your device has root access, then just read on. If not, skip to the next section where I will show you how to change the Mac Address on your Android device without having root access.
Firstly you Need To Download These Apps To work.
Checking Root Access
If you haven’t heard of the term ‘Root’ before, To check the root availability, download the Root Checker app from the given link
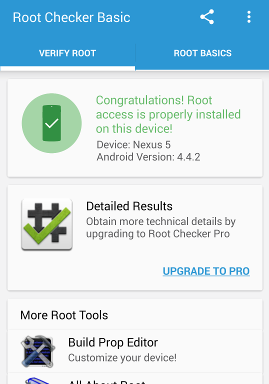
The app is free. Open up the app, tap on ‘Verify Root’ and you will see your root status.
Note:– One of the things to take care of while assigning a new MAC address is that you should not change the manufacturer name. This is represented by XX:XX: XX, i.e., the first 6 places or digits. If you change these, you may face Wi-Fi authentication problems. So if your original Mac address was a2:63:f4:h5:67: vt (it’s obviously made up), change it to something like a2:63:f4:YY:YY: YY. Where YY:YY: YY can be anything you want but also not just anything you want. You’ll need a valid MAC address. Now, of course, nobody keeps a list of valid MAC addresses in their pockets and it can be hard to guess.
You can try this MAC address generator for new MAC addresses.
✅ Using ChameleMAC
ChameleMAC is an app that works with root access and isn’t available on the Google Play Store because it obviously violates some guidelines. Google can’t actively host apps that let users change MAC addresses. So you’ll just have to install it as an APK. You can download the APK from the link below. This app too only works if you have a device powered by a MediaTek chip.
ChameleMAC app
- Download and install the APK from above and launch the app.
- Grant root permissions when asked for.
- There’s nothing much to the app. Right away you see a text input field with two buttons below it. One of the buttons says Generate random MAC while the other says Apply new MAC.
- Input the new MAC address in the text field and tap on Apply new MAC or tap on the Generate random MAC button if you want a random MAC address.
- On the confirmation box that pops up, tap Change to change the MAC address.
This method changes your MAC address permanently unless you manually change it back to what it was.
- Also, Read Get Real Instagram Followers For Free
✅ Using Terminal
This method also requires the use of Terminal, so go ahead and download it from the link above if you haven’t already. After that follow the steps below
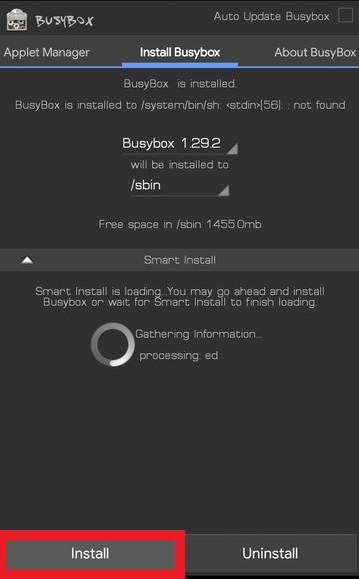
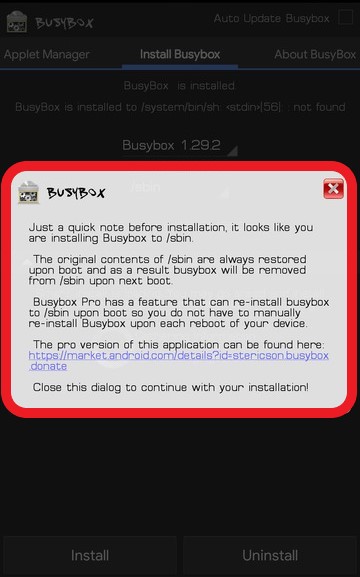
Install Busy Box on Android Devices And Grant Root Access
Just open BusyBox, tap on ‘Install’ and you are good to go. If you already have Busybox installed on your device, just ignore these steps.

Follow the below steps To change your Mac Address
1. Open the terminal window app and type the below commands and hit Enter.
su
2. If you have not already been granted access to the app, it will prompt you for root access. Tap ‘Allow’.
3. To know your current network interface name the below command ‘ip link show‘ and hit enter. Make note of your network interface name. For the purpose of this tutorial, I will consider ‘eth0‘ to be the interface name.
ip link show
4. Now, enter the below command and press enter. Your current MAC address will be displayed. This is just for your information.
busybox ip link show eth0
5. To change the MAC address, type the below command and hit enter. Change ‘XX:XX:XX:YY:YY: YY’ with any MAC address you desire.
busybox ifconfig eth0 hw ether XX:XX:XX:YY:YY:YY
6. You have successfully changed your MAC address! To check the same use the command. You should see the new MAC address you entered.
busybox iplink show eth0
Note that the MAC address change through this method is permanent and does not change upon device restart.
Method 2 – Change Mac Address without Root Access
Worry not, even if you don’t have root access. It is still possible to change your MAC address. Below are step-by-step instructions to temporarily change the Android MAC address without root access:
Limitations:— There are two limitations to this method. The first is, that it almost always works only on devices with MediaTek processors. The second is, that the change is temporary. Your MAC address will go back to the original one if you restart your phone
1. Download an app called ‘Android Terminal Emulator‘ from the given above link.
2. Open the App. Type the Below Command
ip link show
3. Find your interface name from the list. For the purpose of this example, let us consider your interface name as ‘wlan0’. Now, type the below command in the terminal emulator to change the MAC address where you have to replace ‘wlan0’ with your own interface name and ‘XX:XX:XX:YY:YY: YY’ with the new MAC address you want to change to.
ip link set wlan0 XX:XX:XX:YY:YY:YY
4. Now go and verify if your MAC address has changed properly.
Change Mac Address On Windows
There are three ways to change the MAC address on Windows:
- Change your MAC address from Device Manager
- Using Registry Editor
- Use third-party tools to change your MAC address
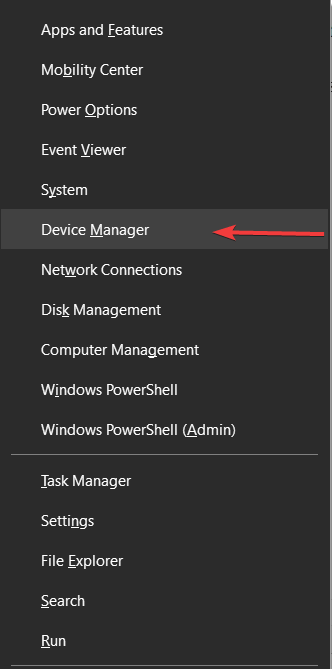
Method 1 – Change your MAC address from Device Manager
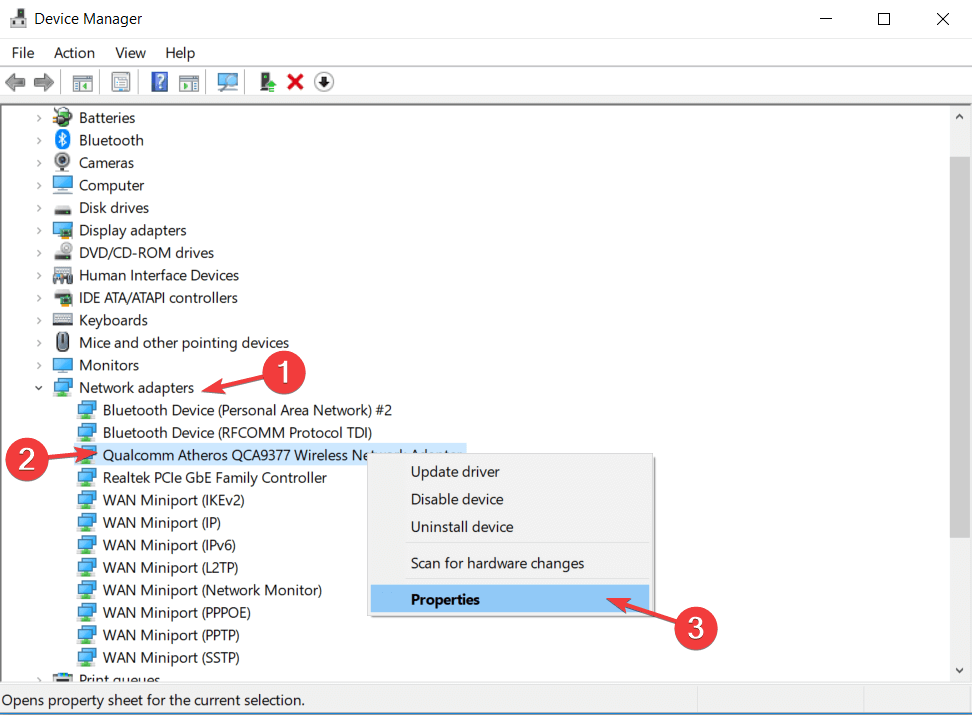
1. Press Windows Key + X and select Device Manager from the list
2. Once Device Manager opens, locate your network adapter, right-click it and choose Properties
3. Once the Properties window opens, navigate to the Advanced tab and select Network Address from the list of Properties.
4. Select the Value option and enter any 12-character hexadecimal random value
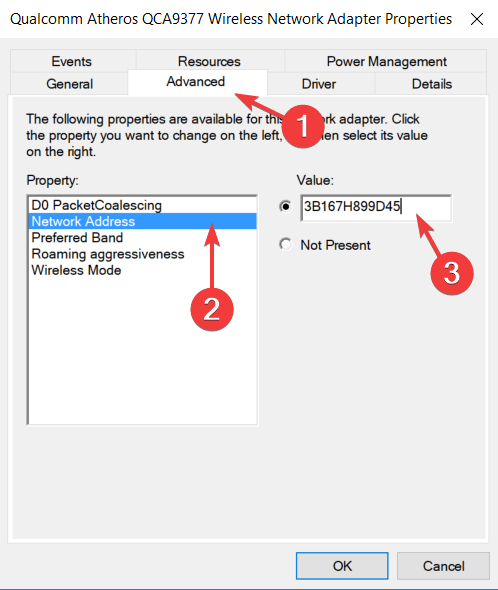
5. Click OK to save changes.
As you can see, changing your MAC address is rather simple, but keep in mind that your actual physical MAC address remains the same. In case anything goes wrong you can simply revert to it by following the aforementioned steps. Just select Not Present in Step 4, and you’ll easily revert back to your default MAC address.
Method 2 – Using Registry Editor
In addition to Device Manager, you can also change your MAC address by using the Registry Editor. Take care to change your registry carefully to avoid any potential problems.
To change the MAC address of your network adapter using Registry Editor, do the following:
1. Open Command Prompt. You can open Command Prompt by pressing Windows Key + X and choosing Command Prompt from the menu.
2. When the Command Prompt opens, type the below command and press Enter.
net config rdr
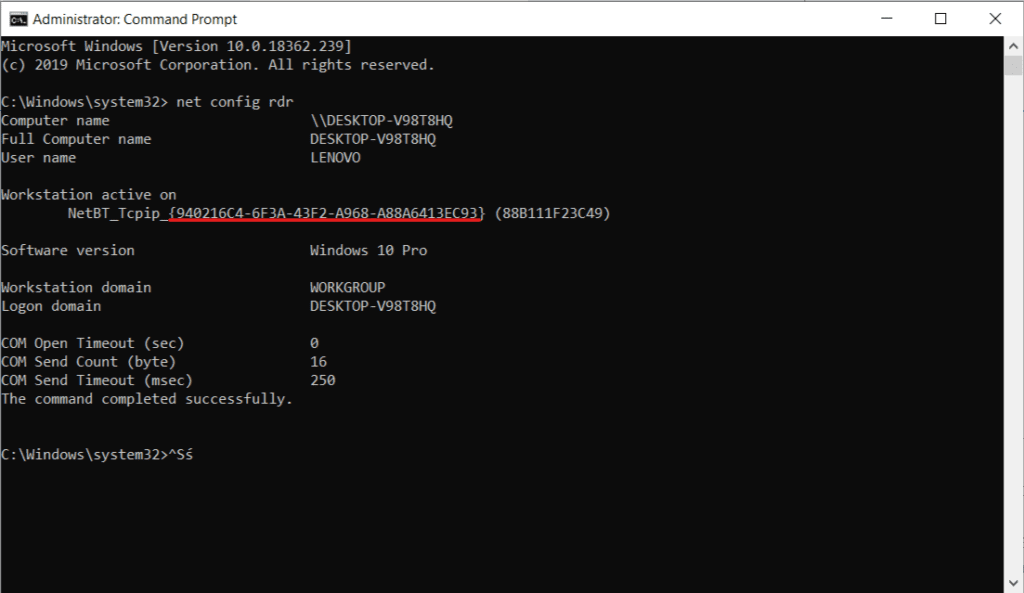
3. Locate the “workstation active” and write down the number between the curly brackets. You’ll need that number for future steps, so write it down, or don’t close Command Prompt. In our example, that number is 940216C4-6F3A-43F2-A968-A88A6413EC93, but it will be different on your PC.
4. Press Windows Key + R and enter Regedit. Press OK or Enter to start Registry Editor
5. When Registry Editor opens, navigate to the following key in the right pane:
HKEY_LOCAL_MACHINE/SYSTEM/Current/Control/SetControl/Class/{4D36E972-E325-11CE-BFC1-08002BE10318}
Note:- While searching for this key you’ll see several similar keys, so pay extra attention and be sure to select the correct one.
6. You should see several folders with names such as 0000, 0001, etc. Each of these folders represents one network adapter on your PC. You’ll need to navigate through each of them in order to find your network adapter.
To find your network adapter check the NetCfgInstanceId value to see if it matches the value that you got in Step 3. In our example it was 940216C4-6F3A-43F2-A968-A88A6413EC93, therefore folder 0002 matches our network adapter.
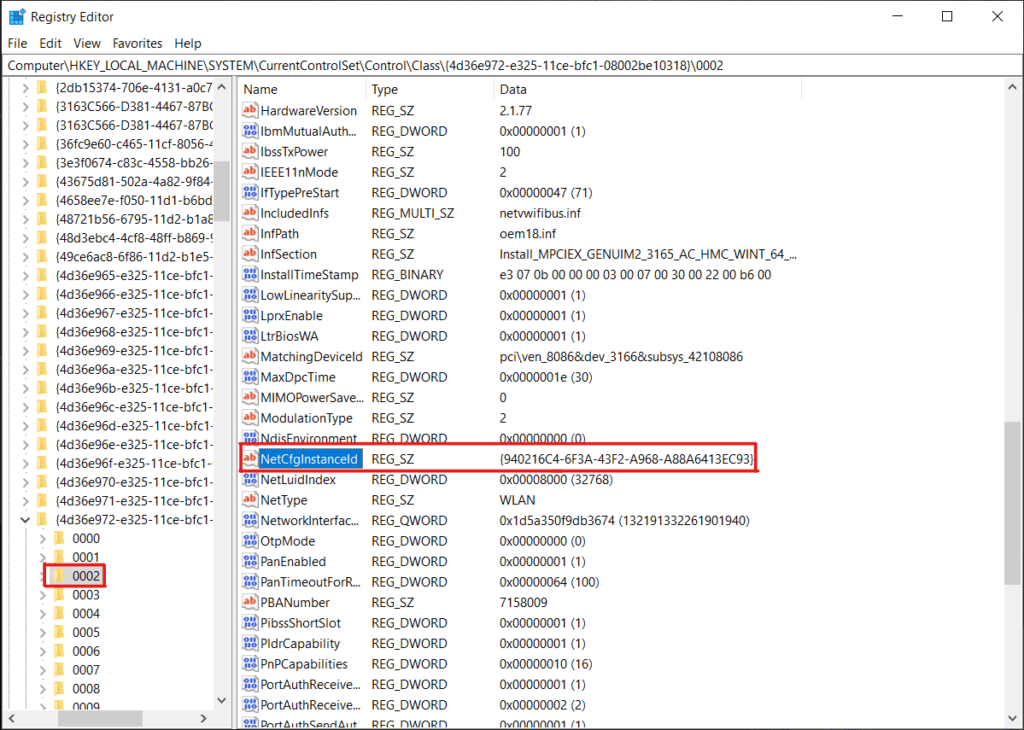
7. Right-click the folder that represents your adapter, in our case, it was 0002 but it can be a different folder on your PC, and choose New > String Value. Enter NetworkAddress as the name and double-click NetworkAddress to open its properties
8. In Value Data enter your desired MAC address. Remember, it has to be a hexadecimal 12-character value.
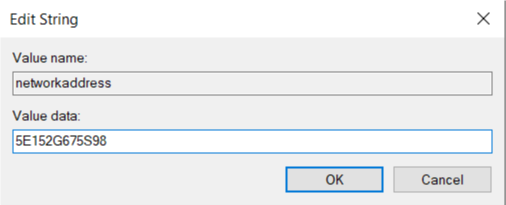
9. Click OK to save changes.
10. Restart your computer or your network adapter to apply changes.
Method 3 – Using third-party tools to change your Mac Address
If you don’t want to do all these steps and looking for a more natural way to change your MAC address, then there are third-party tools available like C that will do the job.
1. First, download the Technitium tool from the Given below link
2. Install and launch the application
3. It will greet with messaging saying the present file is not associated “.tpf” -> click yes to associate this file with the Technitium tool
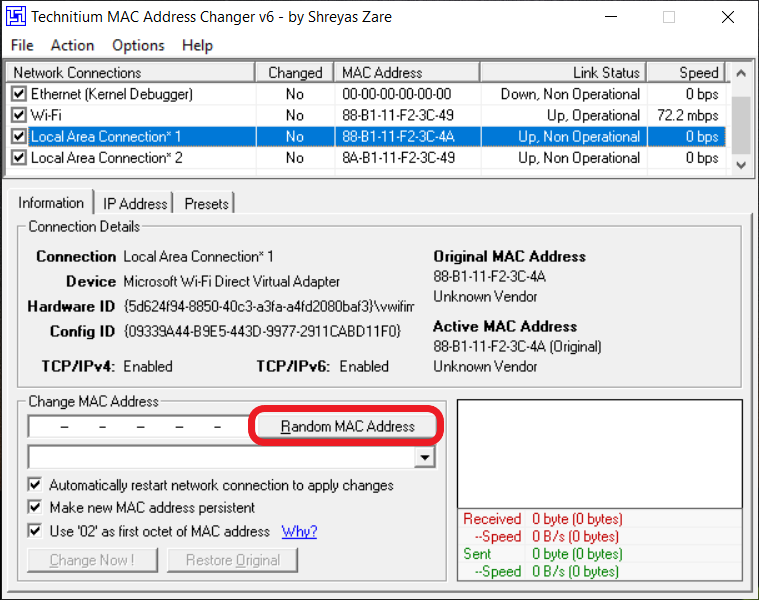
4. On the next screen, the system will show all the network devices currently active along with their MAC addresses.
5. To change the MAC address of a specific adapter, select from the list and hit Random Mac Address to get a random MAC value -> click on the Change Now button to enable the changes
Why would you want to change it?
- The most important reason would be privacy. Anyone in your local Ethernet network can easily see your MAC address with simple tools.
- If your original MAC address is public and revealed, a hacker can use it to hack you. On many networks, access is restricted based on IP address, so when you go offline, the hacker can use your MAC address and access the network as ‘you’.
- If you want to access a network that limits access based on MAC address, you can change the MAC address on the device you want access to and access the network.
- Internet Service Providers often use your MAC address to identify and authenticate your internet connection. In case your network stops working, instead of contacting your ISP, you can change the new network card’s MAC address.
Conclusion:
So, that is all about How to Change the Mac Address on your devices. By following the steps above you can easily change the Mac address on your devices. But be careful while changing the Mac address, it can also harm your devices if anything goes wrong.
Also, read other useful articles
- How To Hack Wifi Password On Android
- How To Hack Android Phones Easily Without Root
- How To Hack Android Device With Termux