Everyone knows Ads are annoying. They interrupt our experience on Android devices, whether we’re playing games, watching movies, browsing the internet, or using certain apps. They keep popping up everywhere, making it frustrating to enjoy any activity.
However, many people know how to block annoying ads on PCs using ad blockers but are unaware that they can also block ads on Android by using the Private DNS option.
So, To block ads using private DNS, this guide will show you the step-by-step process of setting up Private DNS on your Android device.
Also, Read How To Flush Or Clear DNS Cache On Android Devices
What is Private DNS, and How Does It Work?
Private DNS is a feature built into Android that lets you use secure DNS servers. Think of DNS (Domain Name System) as the internet’s phonebook. When you type a website name, DNS translates it into an IP address so your device can connect to it. Private DNS takes this one step further by encrypting the connection, which boosts your privacy.
But here’s the kicker: you can also use it to block ads. By setting your Android to use an ad-blocking DNS service, you can filter out most of those annoying ads at the network level.
How To Block Ads On Android Using Private DNS
There are many private DNS services available that can block ads on Android, but AdGuard DNS is among the best. It’s free and works on almost all devices. However, it only works on Android phones running Android 9 Pie and above versions.
Now, follow these simple steps to configure AdGuard DNS on your Android device.
1. Open the “Settings” app on your Android device.
2. Then, scroll down and choose “Network & Internet” or “Connection or sharing,” depending on your device’s setting. Or, you can search for “Private DNS” on the search bar.
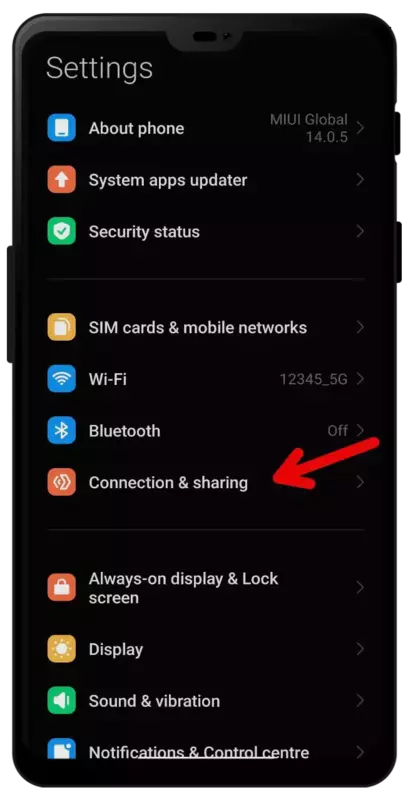
3. In the Connection & sharing settings, tap on the “Private DNS.” option.
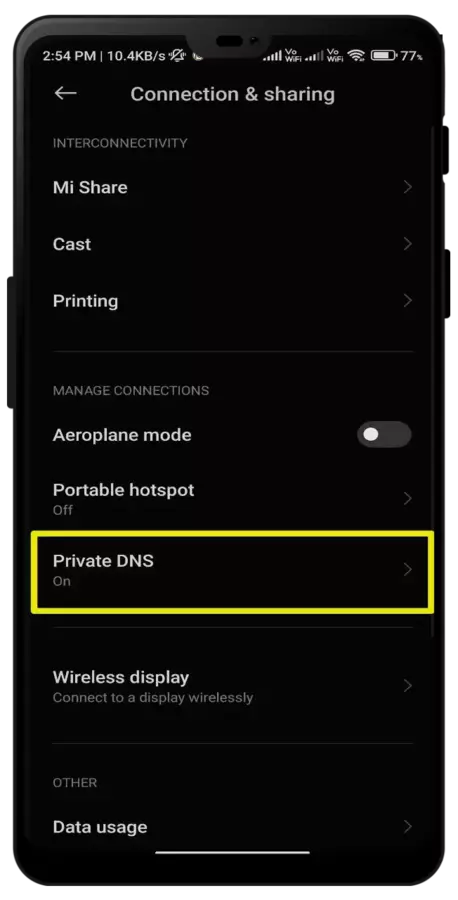
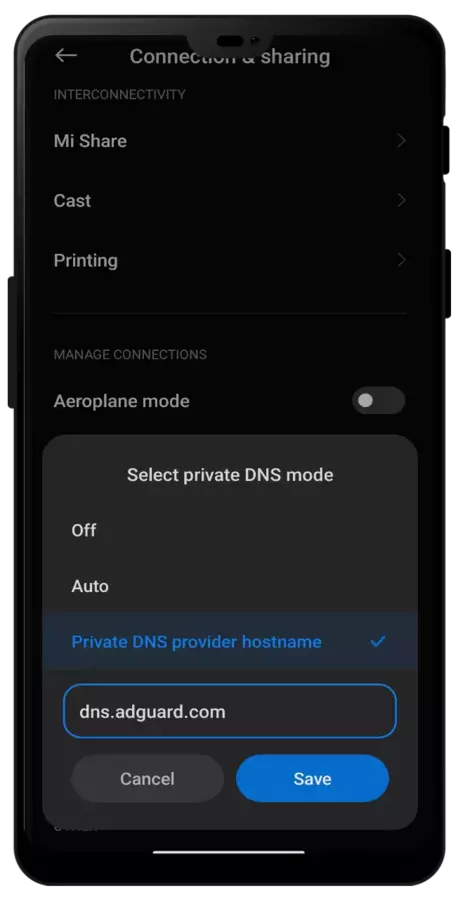
4. Now, you’ll see the option to “Configure Private DNS”. Click on that. In the hostname field, type in dns.adguard.com and tap save.
That’s it. After these steps, you won’t see any popup ads on your Android devices, including apps and web browsers.
Block Ads on Android Using DNS Changer
The DNS Changer is an Android application that allows you to adjust the DNS settings on your device. It helps in accessing restricted content, improving internet speed, and blocking ads or malicious websites.
So, to block ads using the DNS changer, follow the steps below.
1. First, Download and Install the DNS changer app, on your Android devices.
2. After that, open the application and tap on “Choose a DNS Provider,” then select “Custom DNS“.

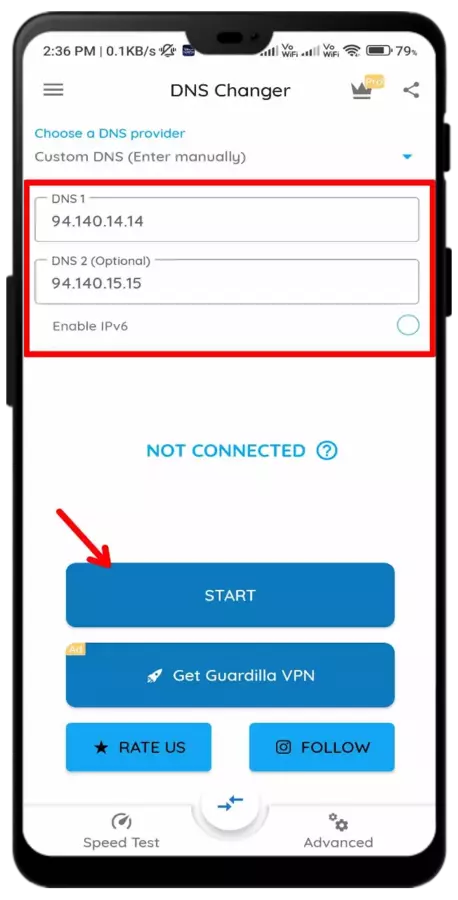
3. Now, you will see two input boxes labeled “DNS 1” and “DNS 2”. Enter “94.140.14.14” in the DNS 1 box and “94.140.15.15” in the DNS 2 box. After that, Tap on “Start”.
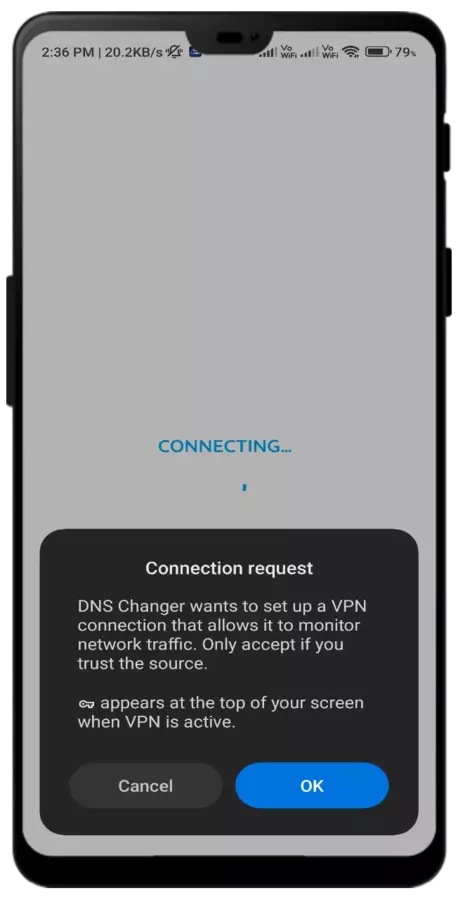
4. Once you tap the start button, a prompt will appear asking you to allow the DNS changer app to set up a VPN. Tap “OK.”
5. Now, the app will start the VPN connection and enable the AdGuard DNS on your Android device.
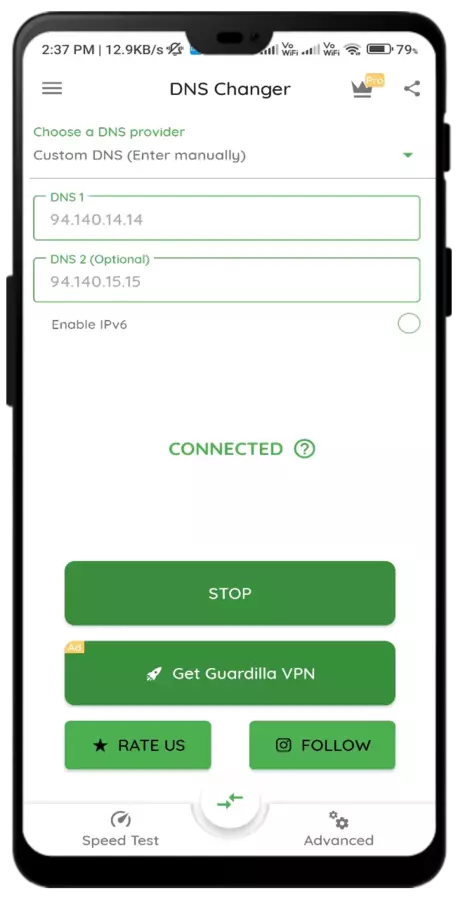
That’s all! From now on, you won’t see any ads while browsing the web or using any apps or games.
Pros and Cons of Using Private DNS for Ad Blocking
Pros:
- No extra apps needed: It’s built into Android, so no installations are required.
- Saves battery and data: Blocking ads reduces data usage and prevents background ad trackers from draining your battery.
- Improves privacy: Encrypting your DNS queries protects you from prying eyes.
Cons:
- Doesn’t block YouTube ads: Unfortunately, this method can’t filter ads within YouTube.
- May break some apps: Certain apps rely on ad servers to function properly and may act up when those servers are blocked.
Troubleshooting Common Issues
If you face any issues after enabling Private DNS, here are some tips:
- Are websites not loading? Double-check the hostname you entered. A single typo can mess things up.
- Slow internet? Some DNS servers may slightly affect browsing speeds. Try switching to another DNS provider like Cloudflare (1.1.1.1) or Quad9.
- Are ads still showing? Remember, Private DNS can’t block every ad, especially within certain apps like YouTube.
Conclusion
Blocking ads on Android using a private DNS is a simple, effective, and free solution that anyone can try. While it may not catch every single ad, it does make your browsing and app experience a lot better. Plus, it’s a great way to protect your privacy and save data.
I’ve been using it daily, and I can honestly say that I can’t imagine going back to the ad-filled chaos. Give it a try and see the difference for yourself—you’ll thank me later!
FAQs
Which DNS should be used to block ads?
One of the best DNS options known for blocking ads is AdGuard DNS (dns.adguard.com).
Is private DNS safe?
Yes, using private DNS can enhance safety and security by encrypting DNS and it also blocking ads and other malicious websites.
What Are Other Ways to Block Ads on Android?
In addition to private DNS, there are several other ways to block ads. You can use ad blocker applications that are available on the Google Play Store that can block ads across various apps and games.
Moreover, you can use web browsers that come with built-in ad-blocking features such as Opera, Microsoft Edge, Brave Browser, and Firefox to enhance your ad-free browsing experience.
Recommended Articles
How To Increase Jio Internet Speed In 2024
How to Quickly Delete All Facebook Posts in Bulk
Does Android Auto keep Disconnecting? Here Are The Easy Fixes