Are you experiencing some network-related issues such as a poor internet connection or being unable to connect to certain websites? There’s a chance your DNS cache could be the culprit.
DNS (Domain Name System) cache helps speed up your internet experience by storing information about the websites and services you access. However, over time, this cache can become outdated or corrupted, leading to connectivity problems.
To resolve this, simply flush or delete the DNS cache, and the website should start loading. If you are experiencing similar issues, you can follow our guide on how to clear the DNS cache on an Android device.
Also, Read How To Block Ads On Android Using Private DNS
What is DNS cache and why clear it?
The DNS cache acts like a mini address book, helping your device remember such as your recently visited websites. While it improves speed, it can also store outdated or incorrect information when websites update their IP addresses or when your device connects to a problematic network. Clearing the DNS cache refreshes these records, improving connectivity.
I’ve once encountered situations where my favourite apps are unable to update or certain websites wouldn’t load properly. After trying the usual fixes, clearing the DNS cache worked like magic, restoring normal functionality.
How To Clear DNS Cache On Android Devices
Unlike PCs, Android devices don’t have a single “flush DNS” button. However, you can clear the DNS cache using several methods. Here are the most effective ones:
1. Restart Your Device
The simplest way to clear the DNS cache is to restart your Android phone. This method works because the temporary system cache, including DNS, is wiped during a reboot.
Steps to Restart:
- Hold the Power button until the power menu appears.
- Select Restart (or Power Off, then turn the phone back on).
I’ve often used this trick when my Wi-Fi suddenly acted up. A quick reboot saved me from the frustration of slow browsing.
2. Turn Airplane Mode On and Off
Enabling and disabling Airplane Mode forces your device to disconnect and reconnect to all networks, effectively refreshing the DNS cache.
Steps to Use Airplane Mode:
- Swipe down to access the Quick Settings menu.
- Tap the Airplane Mode icon to enable it.
- Wait for 10–15 seconds, then disable it by tapping the icon again.
This method has helped me when I needed a quick refresh without restarting my device, especially during travel when switching between different networks.
3. Clear Browser DNS Cache
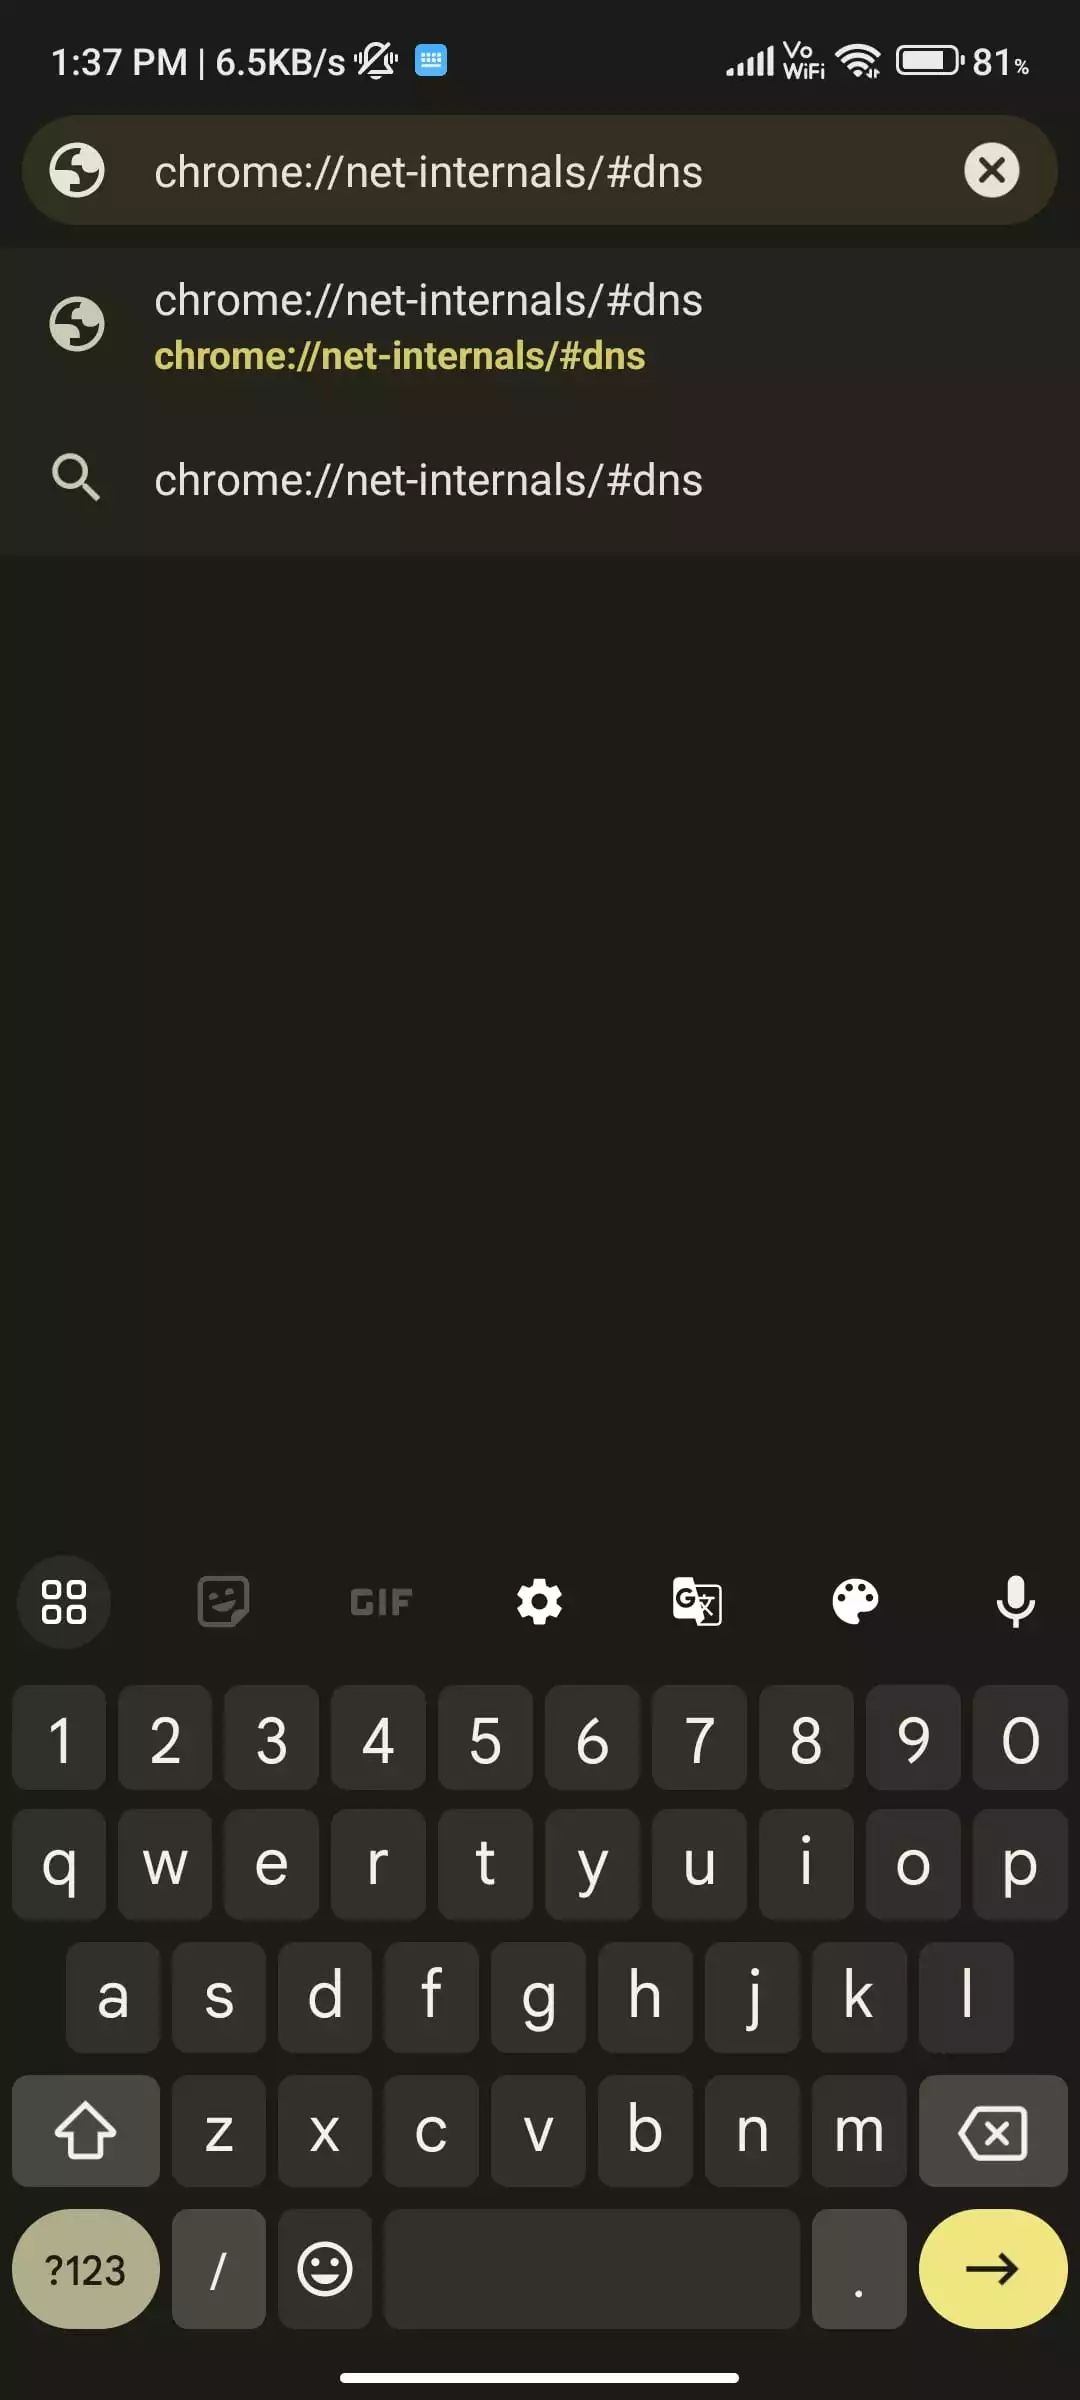
If you are a Google Chrome user, you can easily flush the DNS cache on Android using a hidden Chrome URL. Here’s how to do it.
1. First, open Chrome on your Android device and type the following URL on the address bar. Then, hit Enter.
chrome://net-internals/#dns
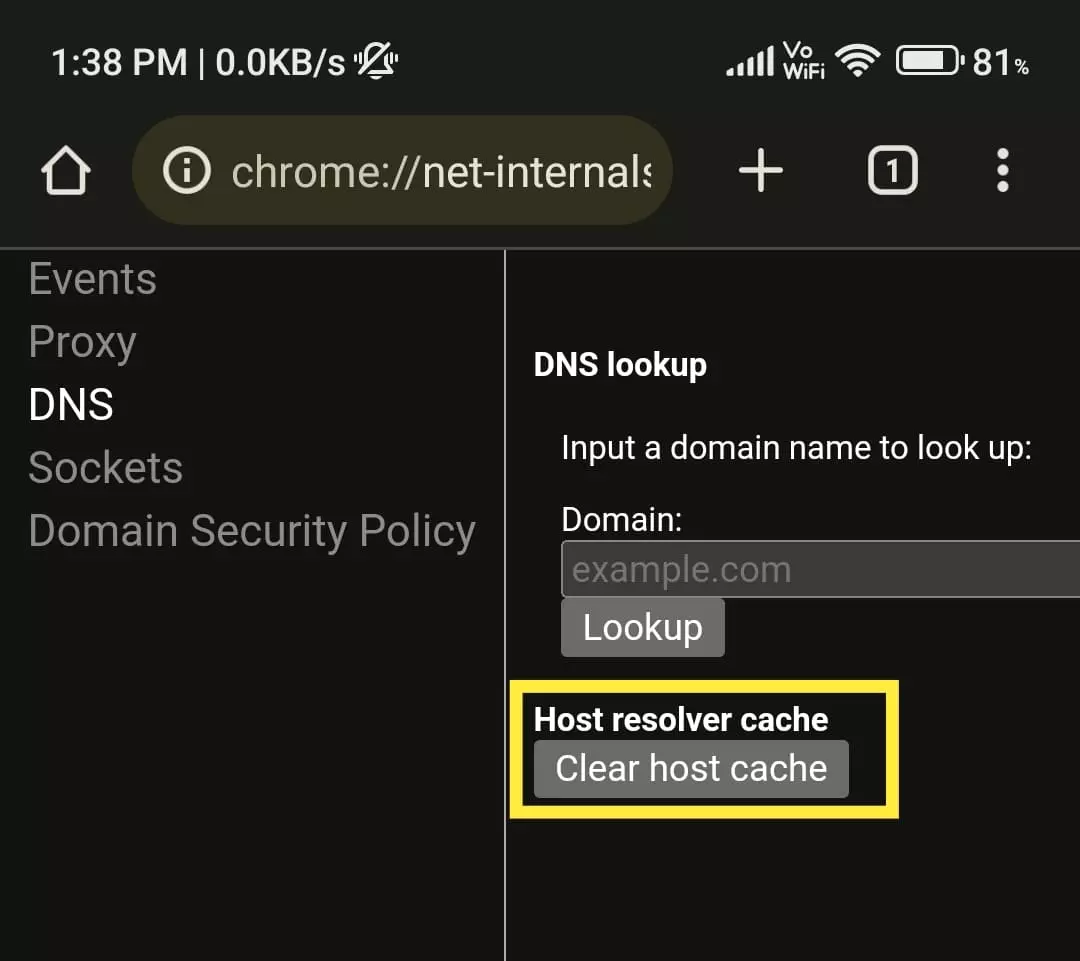
2. This will take you to the DNS lookup page. From the right-hand panel, click the ‘Clear host Cache’ button to flush the DNS cache on your Android device.
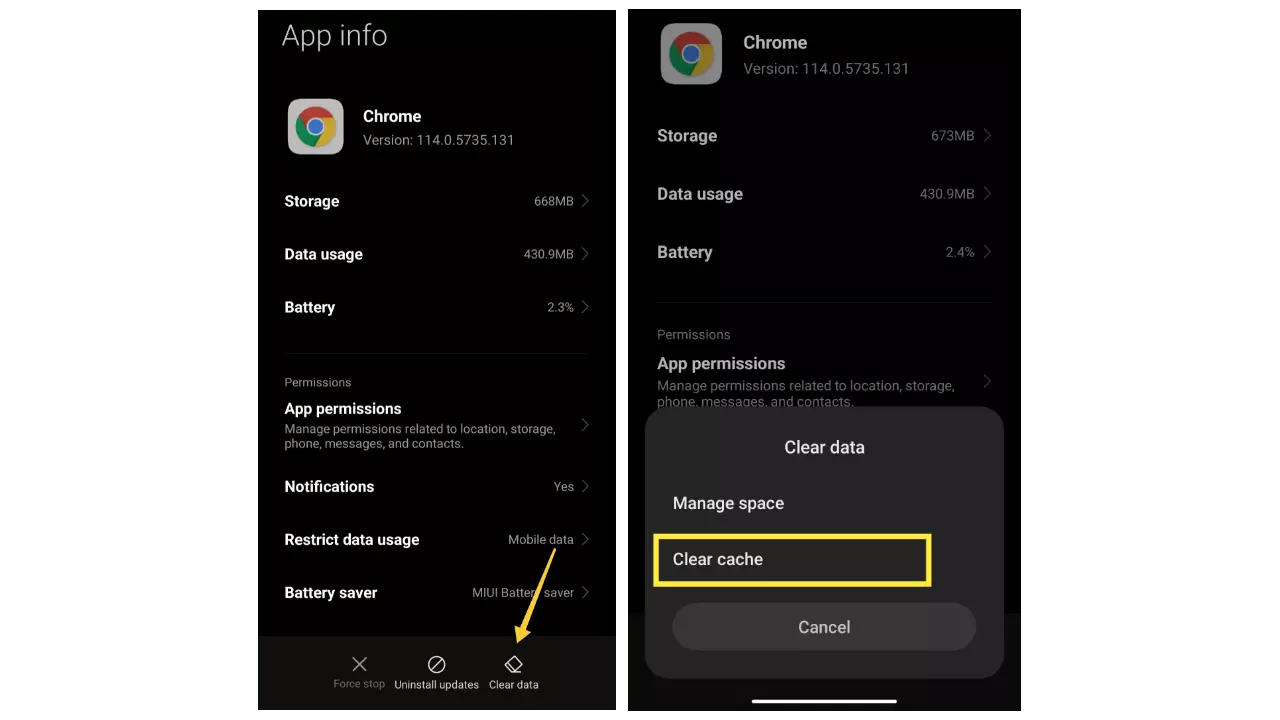
4. Clear DNS Cache using Chrome’s Applications Setting
Clearing the Google Chrome app cache resolves many DNS issues. So if the above method doesn’t work for you, you can clear the cache from Chrome’s App Info page. Here’s how to do it.
1. On your Android phone, tap and hold the Google Chrome icon to open a quick shortcut menu. Tap on the “i” or “App Info” option to open Chrome’s app settings page.
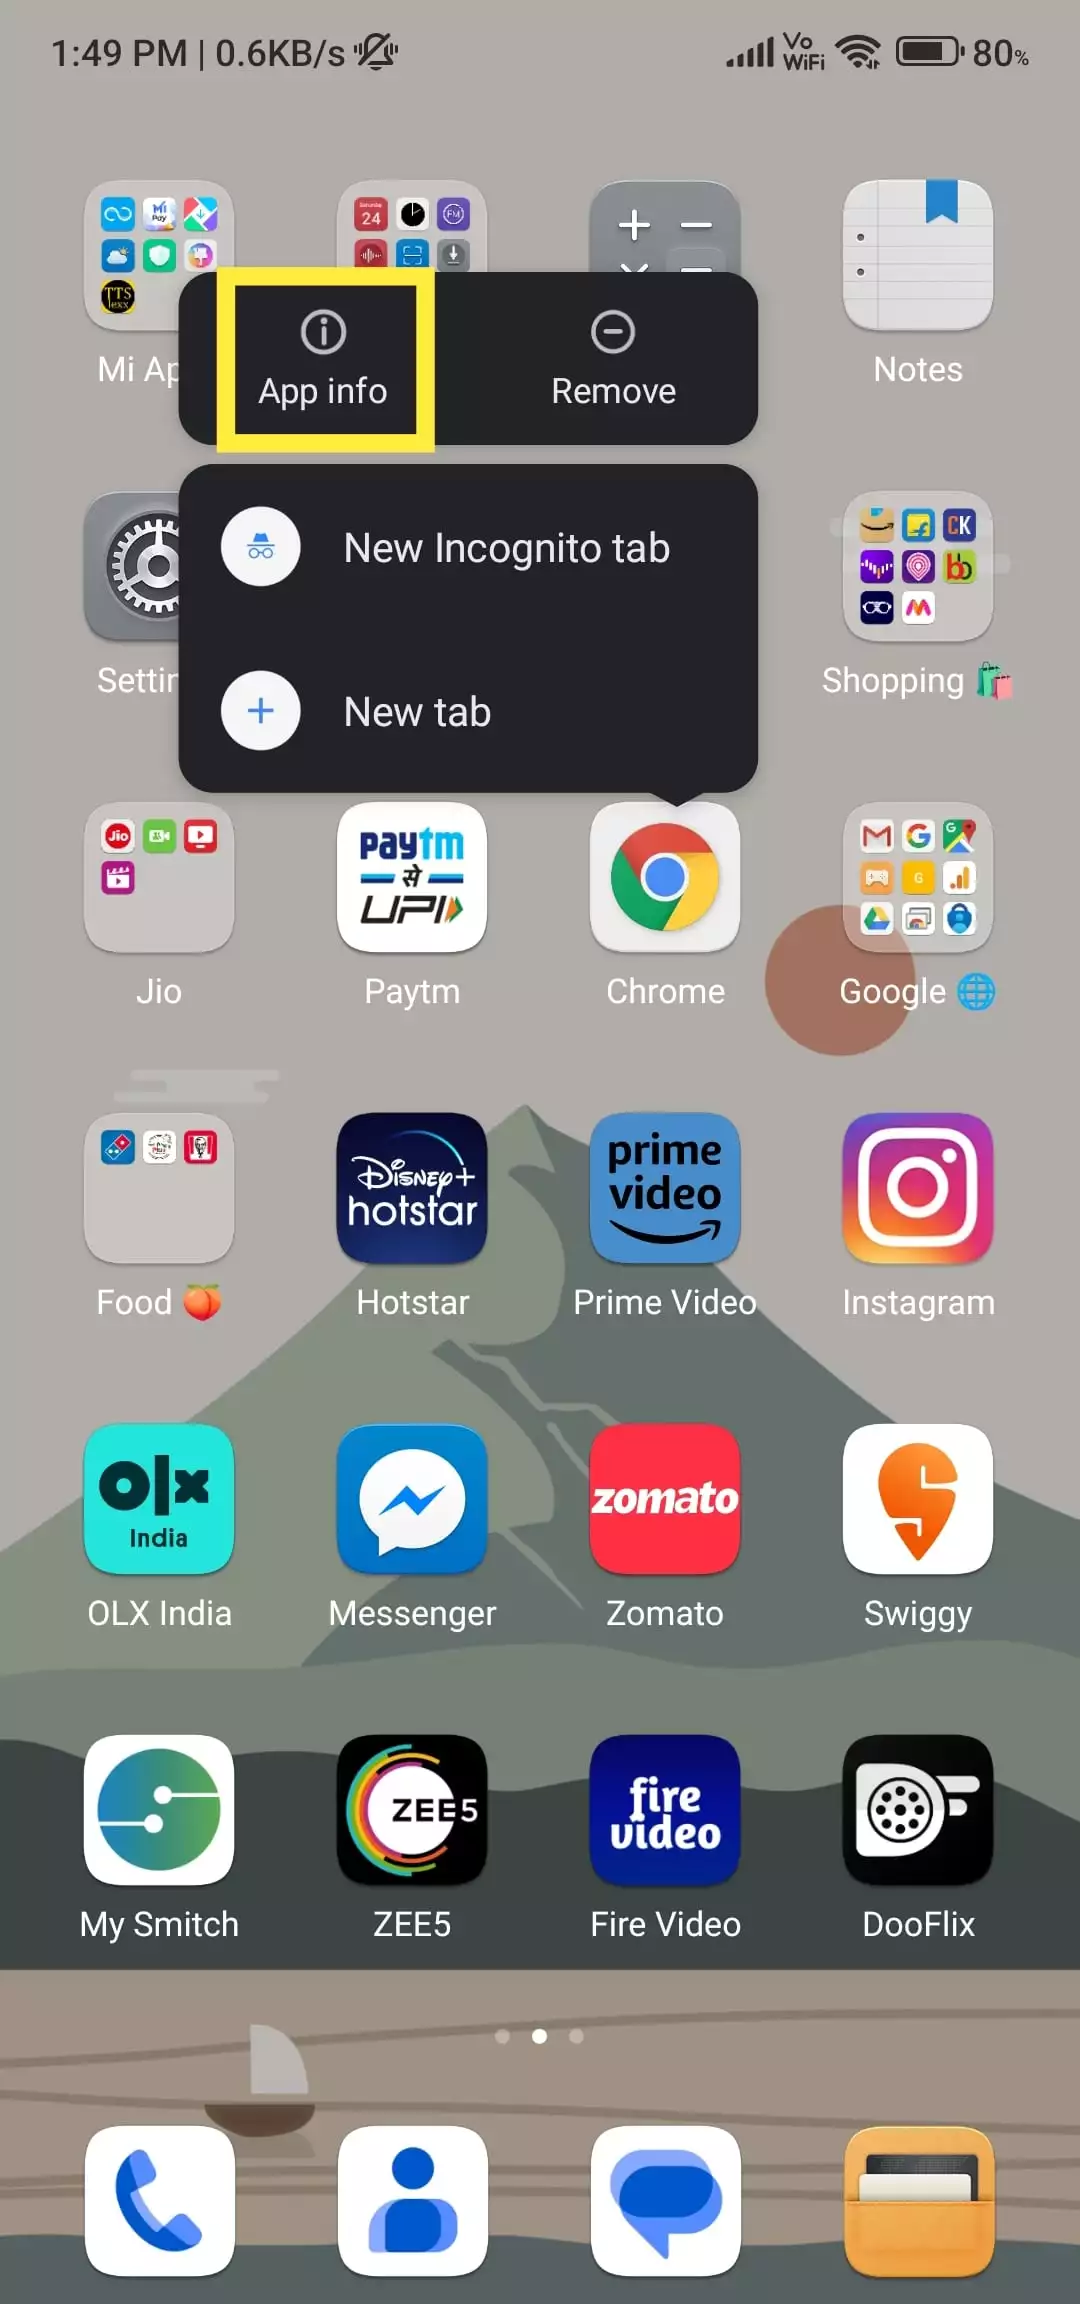
2. Here, click on the “Clear data” option and then tap on “Clear cache”. This will clear all local cache stored on your Android device and possibly fix DNS-related issues as well.
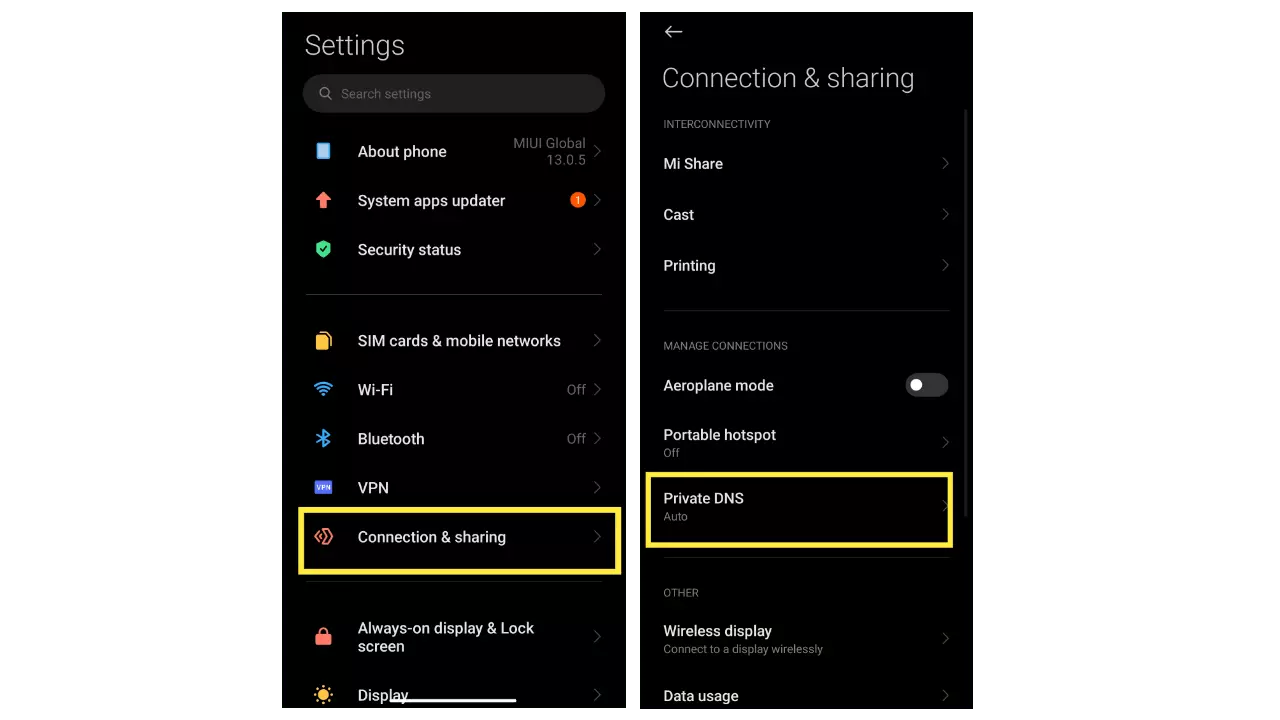
5. Fix the DNS issue by Changing the DNS Server
If the DNS server issue is still not resolved after clearing the DNS cache, you can change the DNS server. With the release of Android 9, Google officially added a system-wide DNS setting. Follow our steps below to change the default DNS server on Android.
On Android 9 and Above
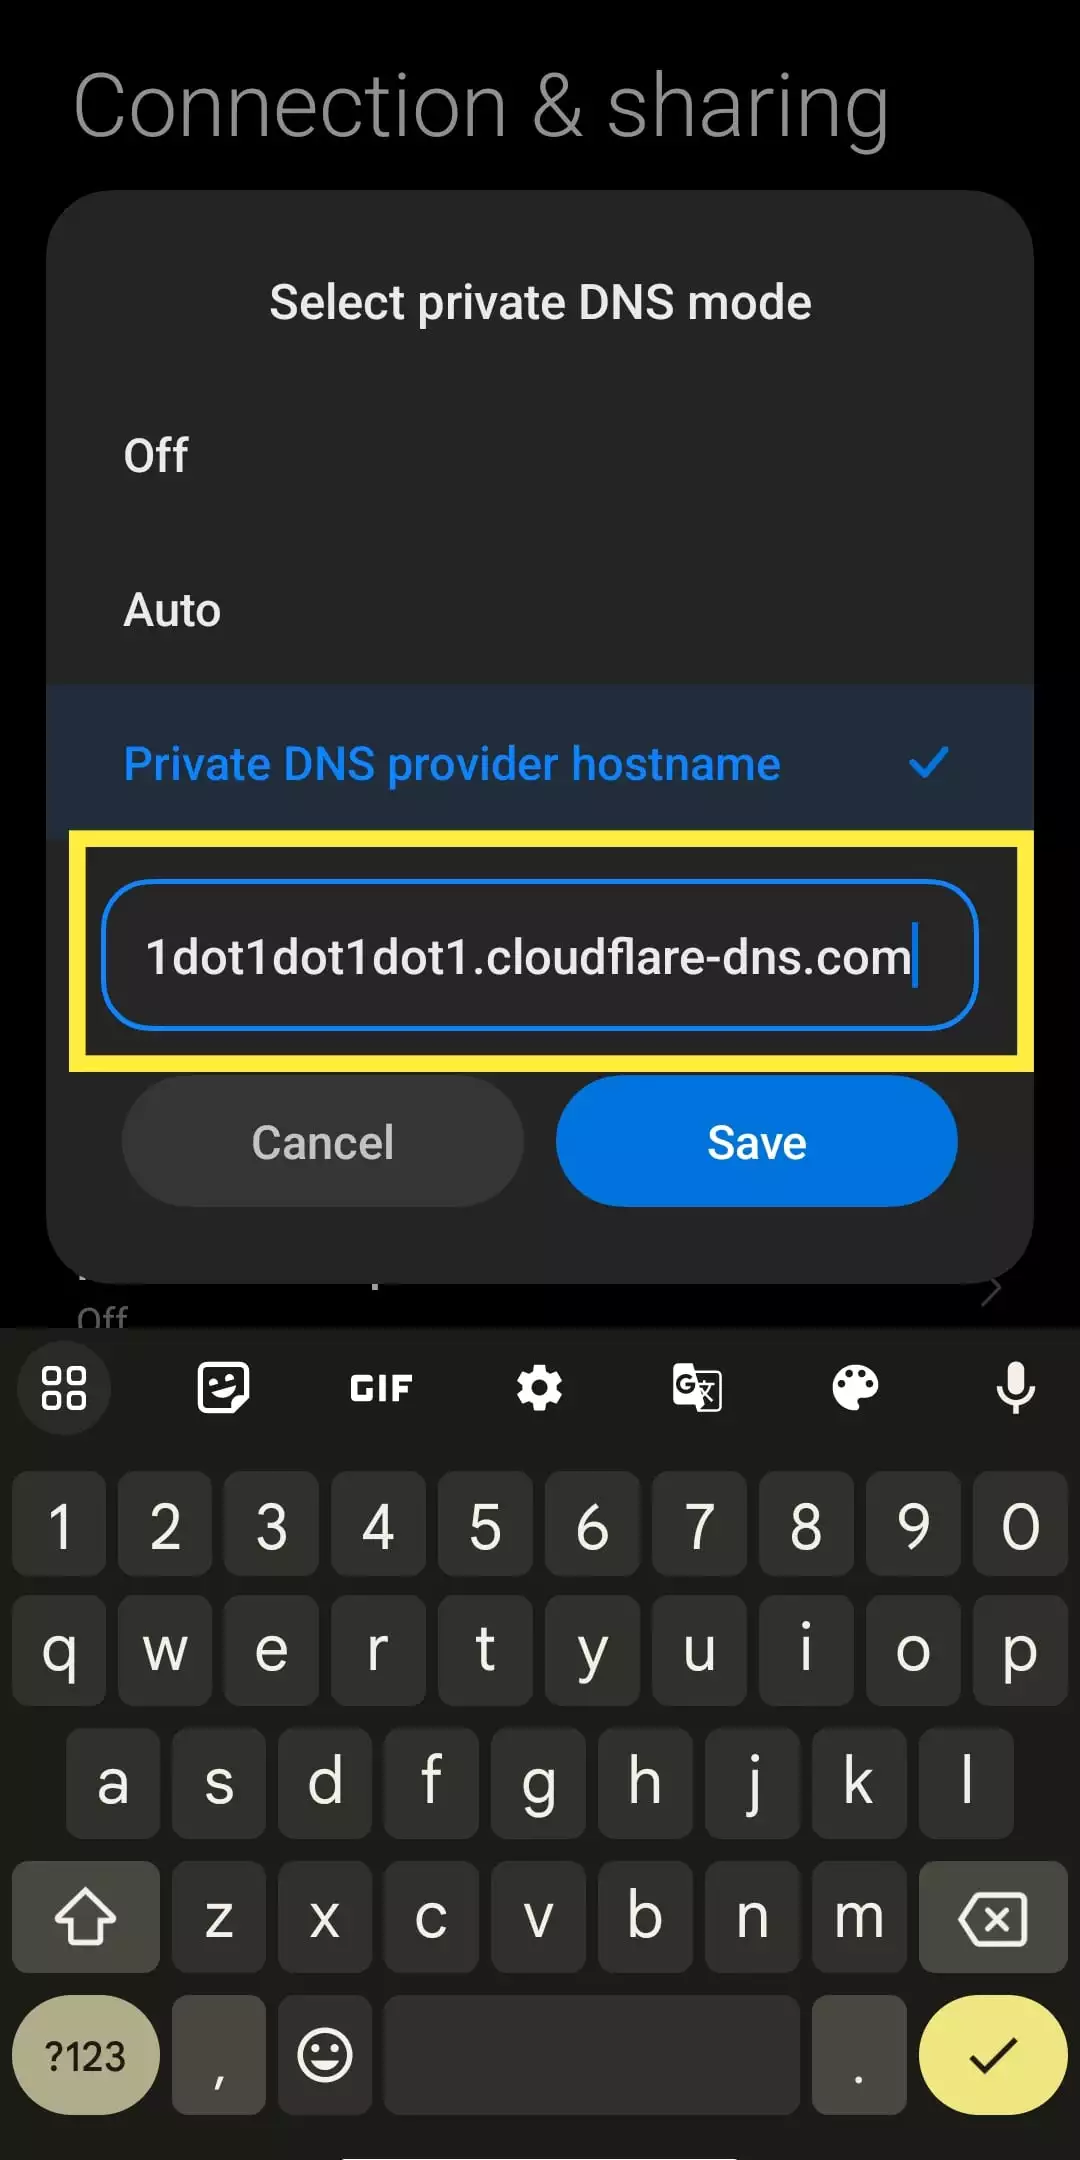
1. Open your Android setting and go to the “Connecting & sharing“ option. Here, you will find the “Private DNS” option.
2. Now, click the “private DNS” option and tap on “Modify“. Then, enter the DNS server of your choice. For example, I have entered Cloudflare’s DNS hostname, which is 1dot1dot1dot1.cloudflare-dns.com.
On Android 8.1 and Older
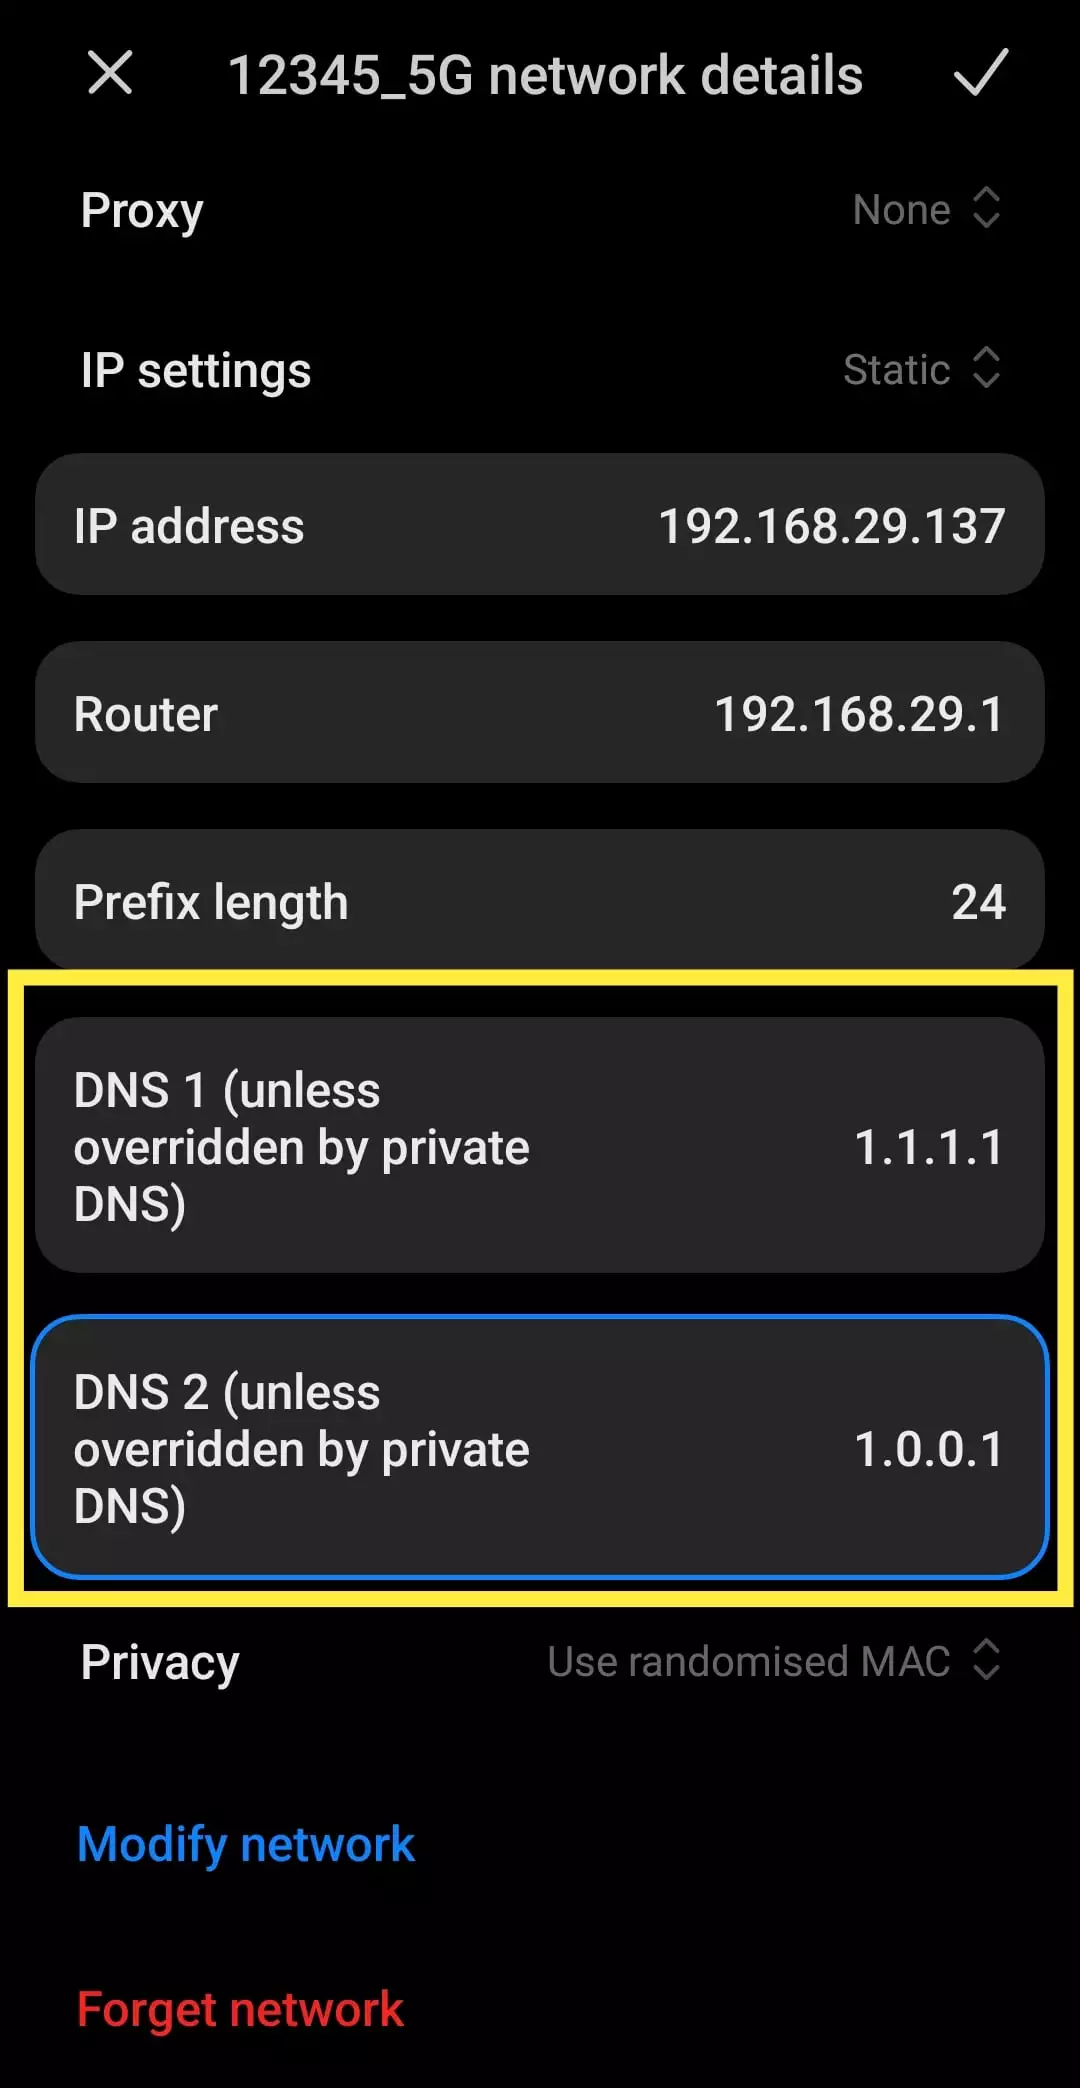
1. On Android 8.1 and older versions, open Settings and go to “Wi-Fi”. Click on the wifi name you are connected to and change the “IP settings” to “Static“.
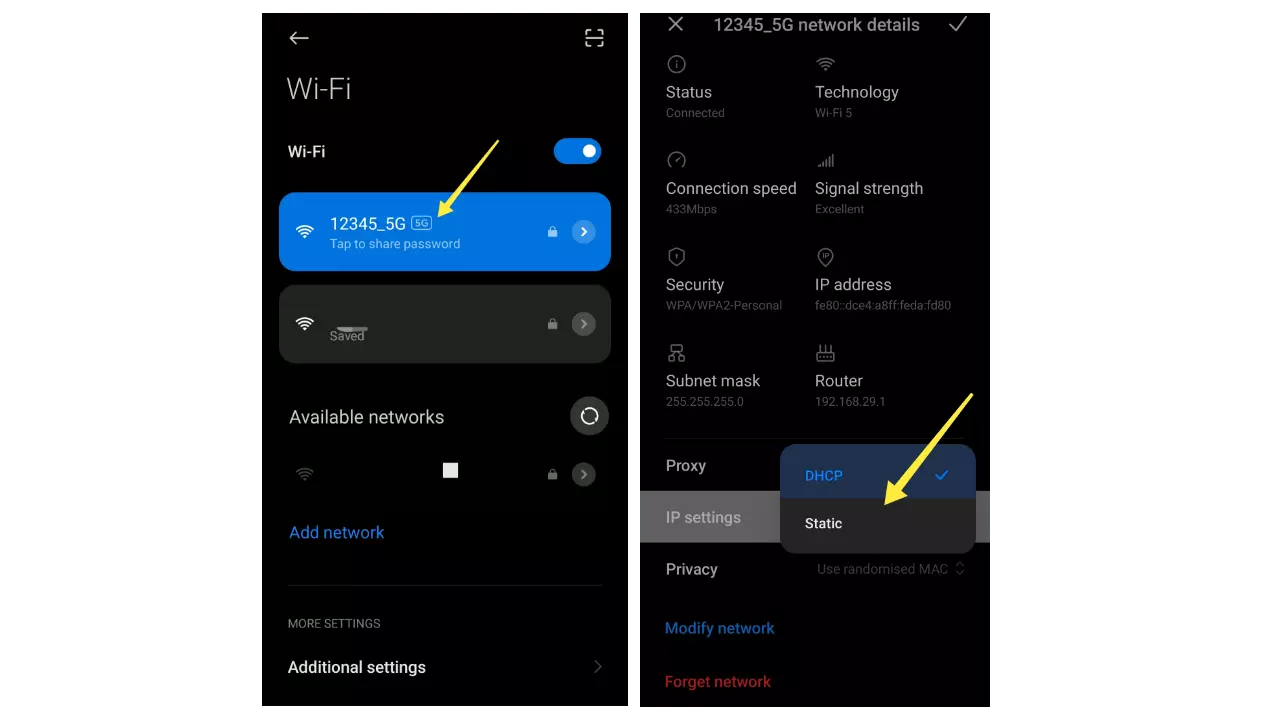
2. Next, you have to change the DNS 1 and DNS 2 addresses of the Wi-Fi connection. For example, You can enter Cloudflare’s DNS Address 1.1.1.1 and 1.0.0.1. Note that, you need to change the DNS server for each Wi-Fi connection manually.
6. Change The DNS Using Third-Party Applications
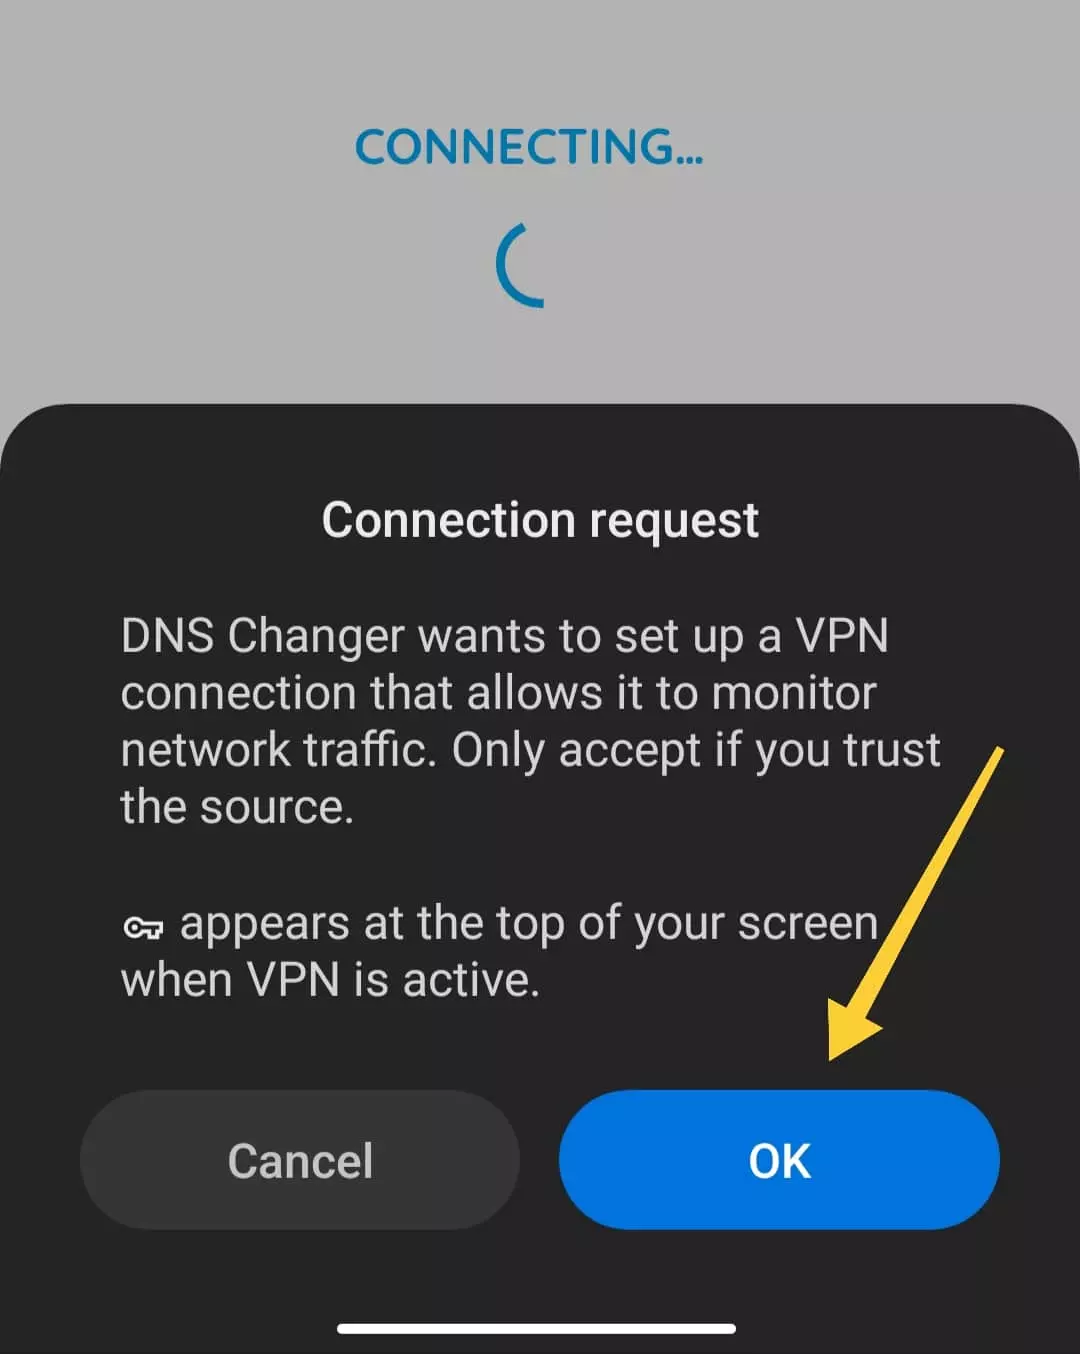
There are a bunch of third-party applications available on the internet that can change the DNS address on Android. However, most applications require root access. So, we will use the Free DNS Changer application that works without root and change the DNS Address easily.
1. First, install the DNS Changer app on your Android device. Then, open it and choose the custom DNS server from the list. ( You can try all the DNS providers one by one and select the best one.)

2. Then, tap on “Start,” and you are done. Then, you will get a pop-up connection request on your screen. Simply tap on the OK button to approve the connection.
Conclusion
Clearing the DNS cache on your Android device is a simple process that can resolve many connectivity issues. Whether it’s a simple restart or changing DNS settings, these methods have worked reliably for me in many situations. Remember, maintaining a clean and fresh DNS cache helps ensure a smooth, fast browsing experience or improves your internet speed.
FAQs
1. Is it OK to flush the DNS cache?
Ans. Yes, it is safe to flush your DNS. Clearing the DNS cache can resolve many network-related issues
2. Will clearing the DNS cache delete any personal data on my Android device?
Ans. No, clearing the DNS cache will not delete any personal data on your Android device. It only removes temporary DNS records.
3. Will clearing the DNS cache remove my saved passwords or browsing history?
Ans. No, clearing the DNS cache does not delete your saved passwords or browsing history. It only clears temporary DNS records stored on your device.
4. Is it necessary to restart my Android device after clearing the DNS cache?
Ans. Restarting your Android device after clearing the DNS cache is recommended to ensure that the changes take effect and the cache is completely deleted.
5. How often should I clear the DNS cache on my Android device?
Ans. You don’t need to clear it regularly. Do it only when you face connectivity issues, slow browsing, or loading errors.
Recommended Articles
How To Use Snapchat Magic Eraser To Remove Unwanted Objects
How To Copy Crosshairs In Valorant
Android Is Looking To Rebrand Nearby Share To Quick Share