Are you facing the ‘No Internet, Secured’ error on your Wi-Fi connection? Preventing you from accessing the Internet even when your connection is working and secure.
Seeing this error makes you worried. But don’t worry. In this article, I will give you the common reasons behind this error and provide step-by-step solutions to fix the No Internet secured error.
This error happens due to several causes, the most common implying a change in your configuration settings like your IP address, which could cause your router to have problems connecting to the Internet.
Also, Read How To Change the Mac Address Of Your Android Devices & Windows
Why This ‘No Internet, Secured’ Message Pop-Ups
There can be many reasons for this No Internet Secured error. But in this article, you will see the main reasons for this error.
- changes in IP settings – Unexpected changes in IP settings can lead to the No Internet, Secured error, which can be caused by the user, or even Windows Updates.
- Invalid IP configuration – This problem occurs due to antivirus software or changes in your network-related settings.
- Faulty Installations – Installation of Software recently in your windows.
So, let’s start and see the possible fixes one by one.
Steps To Fix the “No Internet, Secured” error :
There are several ways to fix this problem. It’s a good thought to go through each of the below solutions, as any of them can fix the problem.
1. Update your network device driver.
If you keep seeing a No Internet, secured message, the problem might be your drivers. Outdated drivers can cause this problem to arise and in order to solve the problem, download and install the latest drivers for your network adapter. To update your driver follow the below steps.
1. Right Click On Start And Select Device Manager, Or go to the search option and type “device manager”

2. Now locate For Network Adapters, and Expand Network Adapters, select your network device, then right-click and select Update Driver.
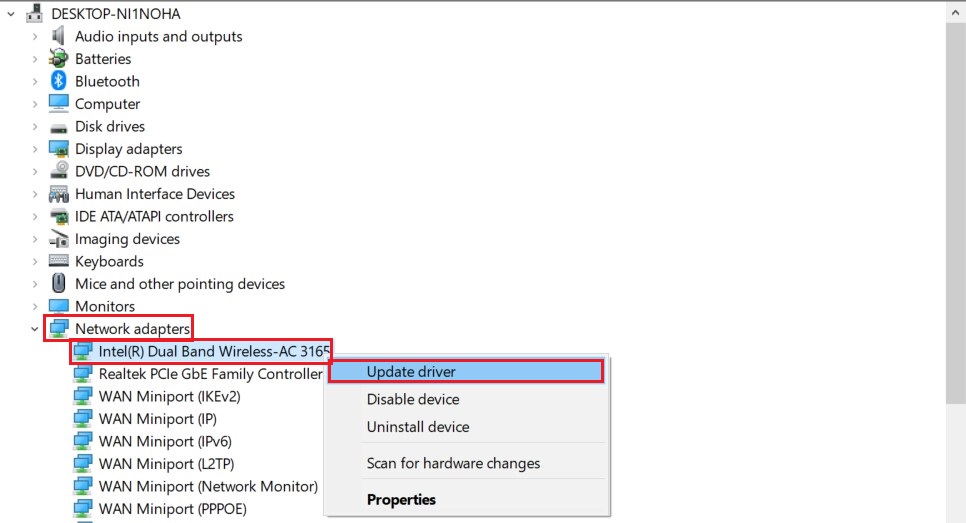
3. In the pop-up box, click on the “Search automatically for updated software driver” option. Windows will automatically search for the latest driver and will update it.
4. Wait until the driver is updated, after successfully updating reboot your pc.
If successful, Windows 10 should automatically connect to the network, and if not see and try our other solutions.
2. Reset Network Adapter
The second step to solve this No Internet Secured issue is to reset the network adapter that your computer uses to connect to the Internet. It may fix your issue. To reset the network adapter on your windows, use these steps:
Note: Windows will reset all the network adapters to their default settings, which means that you’ll need to re-enter the password to connect to a wireless network.
1. Open Settings and Click On Network And Internet.

2. Click on Status, Under the “Change your network settings” section, click the Network reset option.
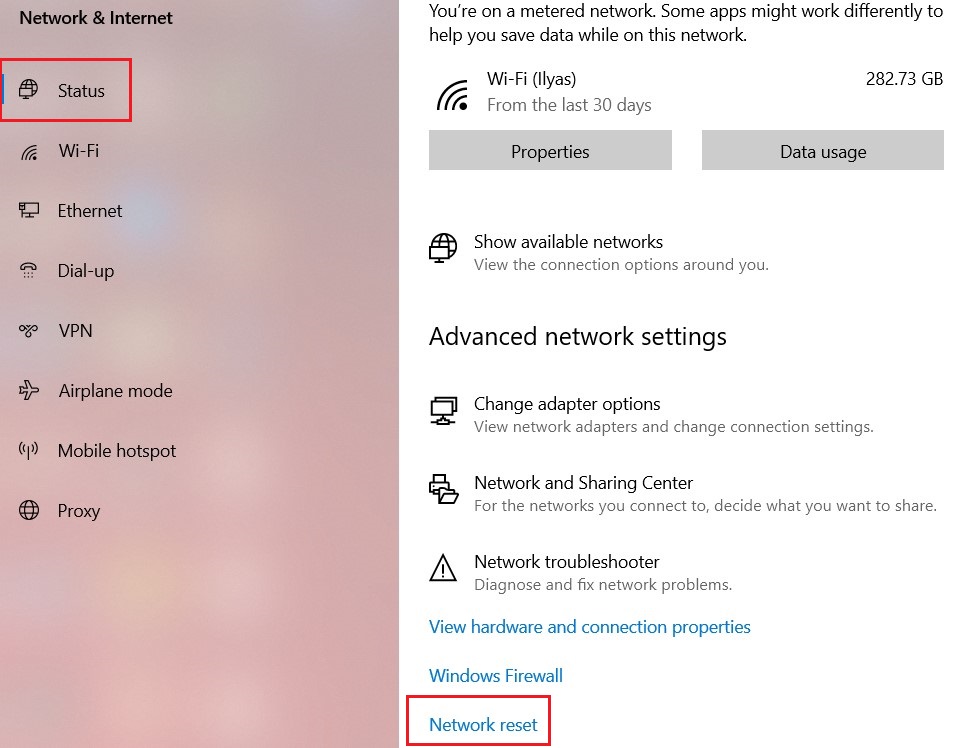
3. After that, Click the Reset Now button and click Yes.
After you finish the steps, the window will restart automatically. On reboot, the issue should go away and you should now be ready to connect to the internet.
3. Disable IPv6 Under Your Network Adapter Setting
Sometimes Changing The Adapter Setting can Fix This No Internet Error on a Windows Device, To Do So Follow The Below Steps.
1. Open Settings and Click On Network And Internet.
2. Click On Network And Sharing Center.
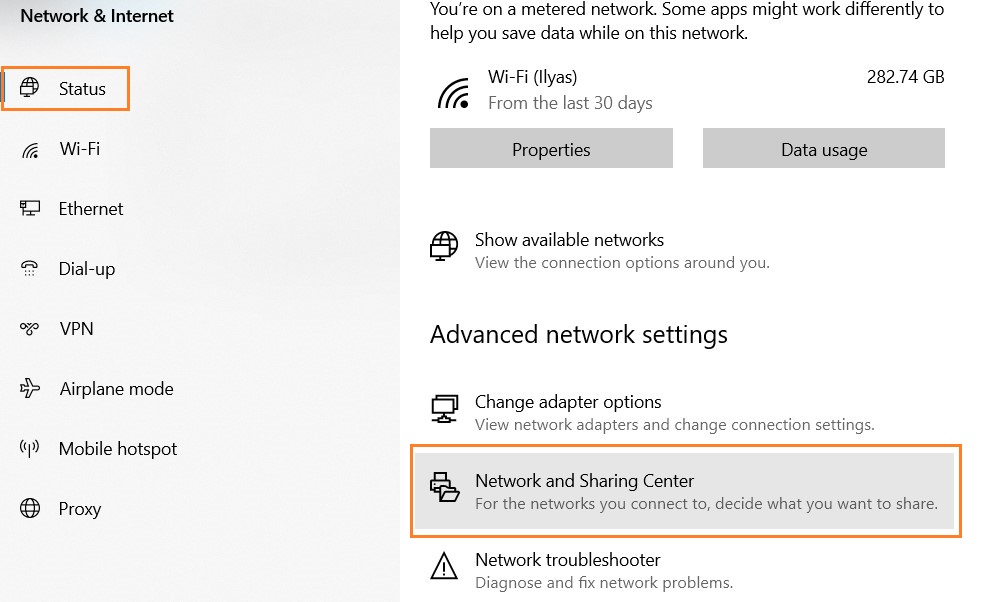
3. Now, A Pop-up will appear, select change adapter setting from the top-left hand side

4. A Pop-will appears, in choosing your network right-click on it, and select the Properties option.
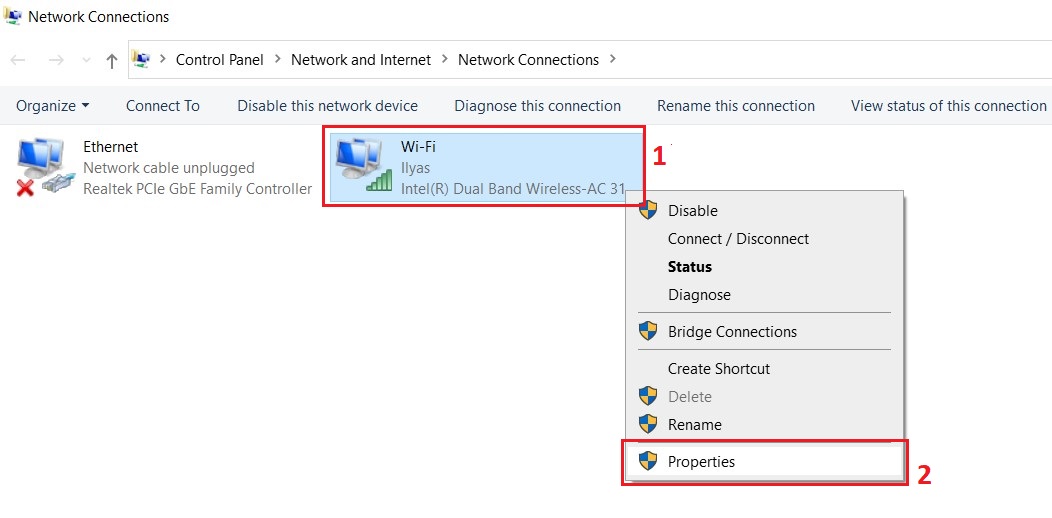
5. Find the Internet Protocol Version 6 (TCP/IPv6) on the list of items that open, and uncheck IPv6 is to disable IPv6. Click on OK.
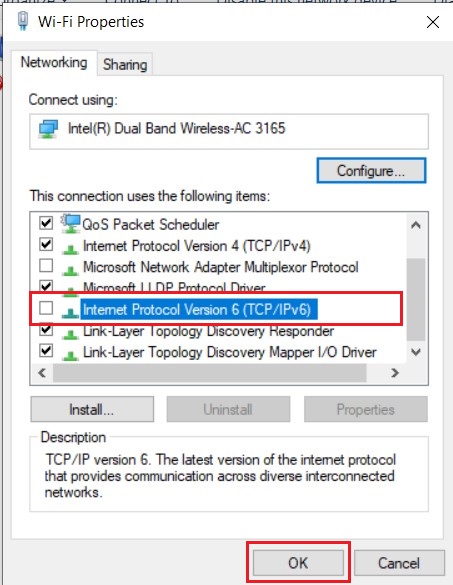
Now, Restart your computer to let the changes take effect. Wait until the computer restarts, and then move to check whether or not the issue has gone.
4. Run Network troubleshooter
if you’re still getting the “No Internet secured” error try this. Windows 10 features some troubleshooting tools, This built-in network adapter troubleshooting diagnostics tool enables you to detect wireless and other network adapter issues.
1. Open Settings and Click On Network And Internet.
2. Click the Network troubleshooter option. It will begin to dissolve and identify problems in your system.
3. Click on “Next” and follow the screen directions to fix the problem with wireless and network adapters.

Once the troubleshooter is finished, restart your PC and check if the problem is solved or still there.
5. Reinstalling Network Adapter
If the above methods do not fix the issue, then you can try to reinstall the network adapter. Follow the below steps to do it:
1. Right Click On Start And Select Device Manager, Or go to the search option and type “device manager”
2. Now locate For Network Adapters, and Expand Network Adapters, select your network device, then right-click and select Uninstall Driver.

3. It will prompt an Uninstall dialogue box. Click on the “Uninstall” button.
4. In the top menu of Device Manager, click on the “Scan for Hardware changes” option to reinstall the driver that you uninstalled in the above step.

It will scan for available hardware on your computer automatically install the deleted driver and restart your PC.
6. Change Property Of Wifi Connection
Changing The Property Of your Wi-Fi connection Can Solve Your No Internet Secured Problem, let’s Give it a try. Follow Our Steps To Do.
1. Open Settings and Click On Network And Internet.
2. Click On Network And Sharing Center.
3. Now, A Pop-up will appear, select change adapter setting from the top-left hand side
4. A Pop-will appears, choose your network, right-click on it, and select the Properties option.

5. In the box, check that the following options are checked.
- Client for Microsoft networks
- File and printer sharing for Microsoft networks
- Link-layer topology discovery mapper I/O driver
- Internet protocol version 4, or TCP/IPv4
- Internet protocol version 6, or TCP/IPv6
- Link-layer topology discovery responder
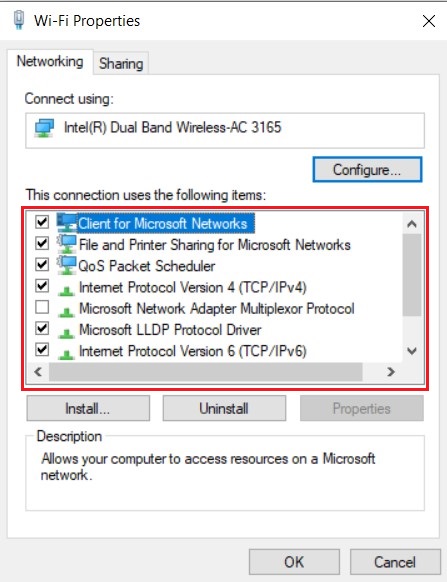
6. After enabling these options, save the changes, and check if the issue is solved.
If the problem still continues, disable your network adapter, wait for a few seconds, and turn it back on again.
7. Use the Complete Internet Repair Tool
Complete Internet Repair is a free open-source power tool to improve your internet connection and get you up in no time. Follow The steps to use this tool.
1. Download the Complete Internet Repair tool from here
2. Launch the tool by double-clicking on the software.
3. Tick all network-related options and click on the “Go” button.
4. After that, Restart your PC.
Alternate fixes
- Check for Router Firmware Updates: Sometimes, the problem isn’t with your computer, but with your router. Updating the router’s firmware can enhance its performance and solve connectivity problems.
- Switch Wi-Fi Channels: If you live in a crowded area where multiple routers use the same channel, interference can cause connectivity problems. Changing your router’s Wi-Fi channel can help improve the connection.
Conclusion
Fixing the “No Internet, Secured” error is usually solved with basic troubleshooting steps, like restarting the router, and more advanced methods, such as updating drivers or resetting network settings. It’s important to follow the issue step by step, as simple fixes often resolve it quickly.
By following the steps in this guide, you should be able to fix the “No Internet, Secured” error and get back online.
Let us know in the comments part if you’ve got any other method to solve this problem.

Recommended Articles
How to Remove api.cactus-search.com Browser Hijacker (Step-by-Step Guide)
How Hackers Are Hacking Your Facebook Account Easily (Guide)
How To Disable Media Auto-Download On WhatsApp